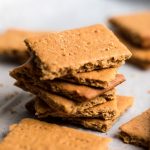
Dairy Free Graham Crackers
This super easy homemade vegan graham cracker recipe will be a new favorite! Perfect for s'mores, pie crusts, and more!
Servings: 20 squares
Calories: 113kcal
Ingredients
- 2 cups whole wheat flour
- ¼ cup brown sugar
- ½ teaspoon baking soda
- ½ teaspoon salt
- 1 teaspoon cinnamon (optional)
- ½ cup plant based butter, cold, cut into 1 tablespoon pieces
- 3 tablespoons maple syrup
- 2 tablespoons plant based milk (more need more)
- 1 teaspoon vanilla extract
Instructions
- To a processor, add 2 cups whole wheat flour, ¼ cup brown sugar, ½ teaspoon each baking soda and salt and 1 teaspoon cinnamon, if adding. Pulse to combine.
- Add ½ cup plant based butter, cut into tablespoon size pieces in different places in your processor so they aren't touching. Then pulse until all the butter has been incorporated. The mixture will resemble coarse sand.
- Add in 3 tablespoon maple syrup, 2 tablespoon plant based milk and 1 teaspoon vanilla. Pulse again until you have a crumbly dough. No unmixed flour should remain. When you touch the dough it should hold together, if it doesn't, you'll want to add 1 teaspoon more milk at a time and pulse until you have that, testing after each teaspoon.
- Lay a large piece of parchment paper down and scoop out the mixture onto the paper. Using hands, form a ball with the dough and shape it into a disc about an inch thick. Sprinkle a small amount of flour on top, then place another same size piece of parchment paper on top. Using a rolling pin, roll the dough out to graham cracker thickness, about ⅛ inch (3mm).
- Carefully pick up the parchment paper and place on a large baking tray. Place in the freezer for 20 minutes while you preheat the oven to 350˚F (177˚C).Note: You may need to cut down the sides depending on your tray.
- Remove from the freezer and remove the top sheet of parchment paper. Carefully, but quickly*, cut your dough using a pizza cutter or sharp knife into desired size pieces. For example, you can do 2x2" squares, 4x2" for rectangles or 1X2" for thinner strips, or use cookie cutters to make teddy graham crackers.
- Use a fork and poke holes all through the dough. Bake in oven for about 20-25 minutes. The dough will just have started to darken around the edges. Do not overcook these. They burn very quickly at the end. Remove from the oven and place on a pan to cool for 15 minutes. Break into individual pieces. Will remain good up to 3 weeks in an air tight container.
Notes
* If making specific sizes, trim off any excess dough around the edges. Then, use this and form back into a disk, then roll out to thinness and make a few extra, but some odd shaped crackers. No need to throw out the dough, it just won't all be perfect squares.
*Don't take long on steps 6 and 7. You want your dough to still be cold when putting in the oven.
**Nutritional facts are just estimates. Please utilize your own brand nutritional values to double check against our estimates.
Nutrition
Serving: 1cracker | Calories: 113kcal | Carbohydrates: 18g | Protein: 2g | Fat: 4g | Saturated Fat: 1g | Sodium: 99mg | Potassium: 77mg | Fiber: 1g | Sugar: 9g | Vitamin A: 230IU | Vitamin C: 0.2mg | Calcium: 28mg | Iron: 0.6mg
QR code
Scan this QR code with your phone's camera to view this recipe on your mobile device.
